How to Stop Condensation on Chilled-Water Pipes
Chilled-water pipe condensation often starts somewhere you can’t see. The insulation can look complete from the outside and still fail at one open joint, a damaged valve cover or an uninsulated support.
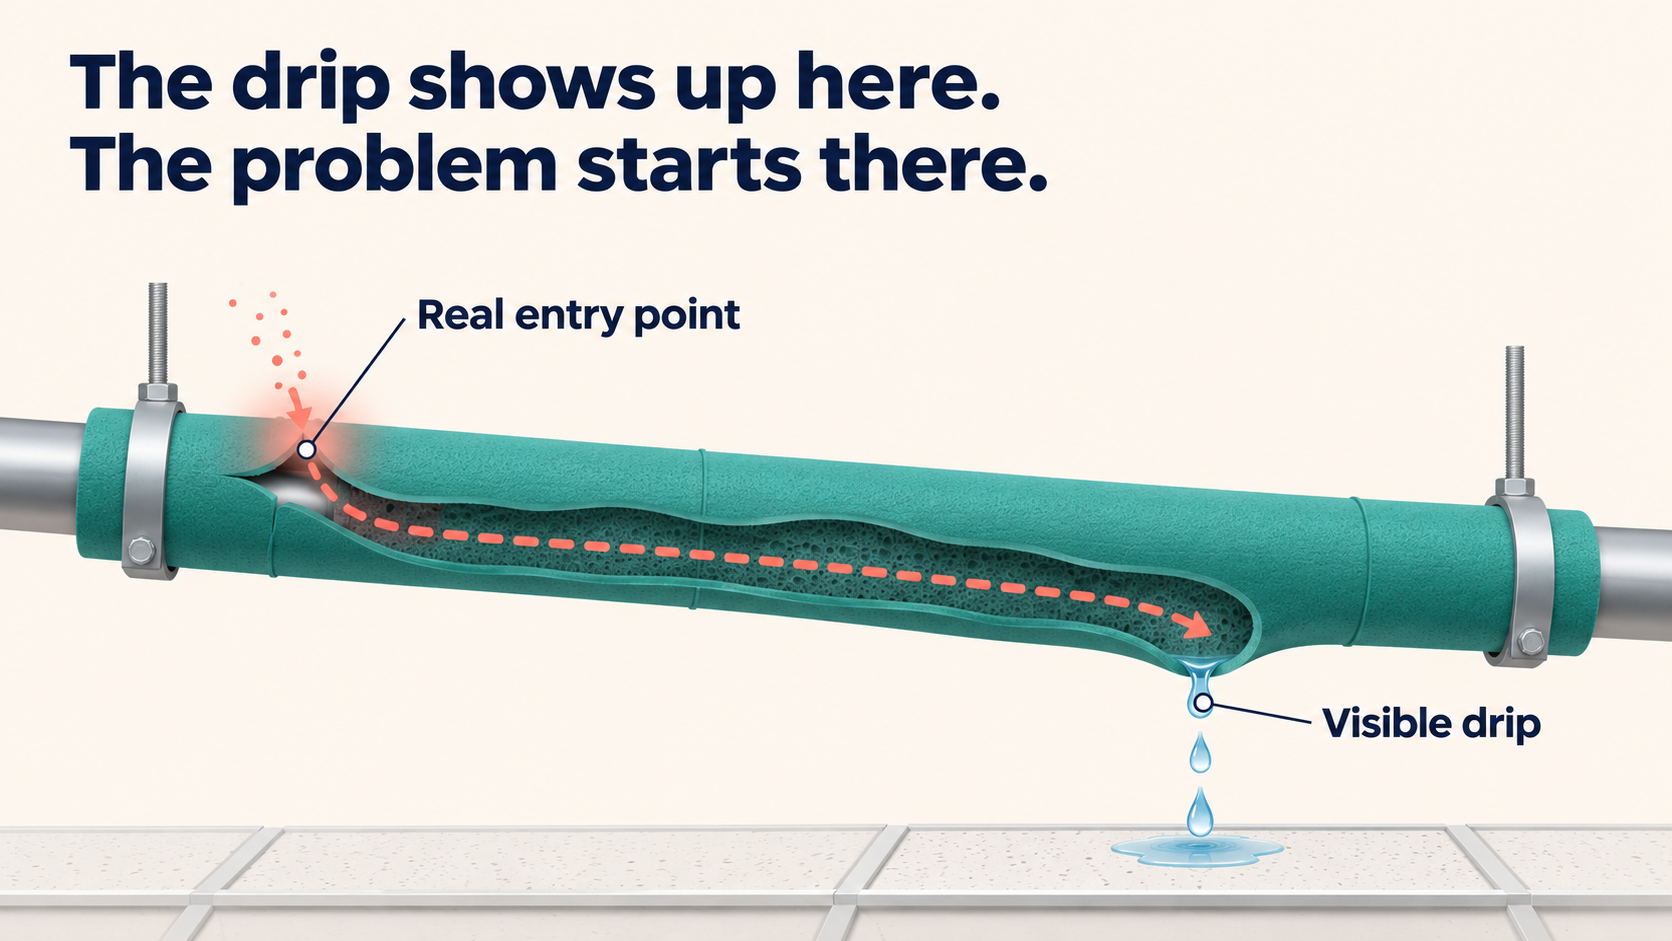
The visible drip—water falling from a pipe onto a ceiling or floor—is usually not where the problem began. It is simply where moisture has collected enough to become obvious. The real entry point may be several metres away, hidden inside the insulation.
That is why patching only the dripping spot rarely stops condensation on chilled-water pipes.
Quick answer: To stop condensation on chilled-water pipes, keep every outer surface of the insulation above the dew point of the surrounding air, and stop humid air from reaching the cold pipe. In practice, that means closed-cell insulation of the right thickness, a continuous vapour barrier, and fully sealed joints, elbows, valves and supports—inspected along the whole pipe run, not just where it drips.
Key takeaways
- Chilled-water pipes run at 4–7°C, well below the 14–27°C dew point of warm, humid air.
- The water comes from the surrounding air, not from a leak inside the pipe.
- Most failures start at joints, seams, elbows, valves and supports.
- Wet insulation should be replaced, not dried and reused.
- Inspect the full pipe run before you repair anything.
Why Do Chilled-Water Pipes Sweat?
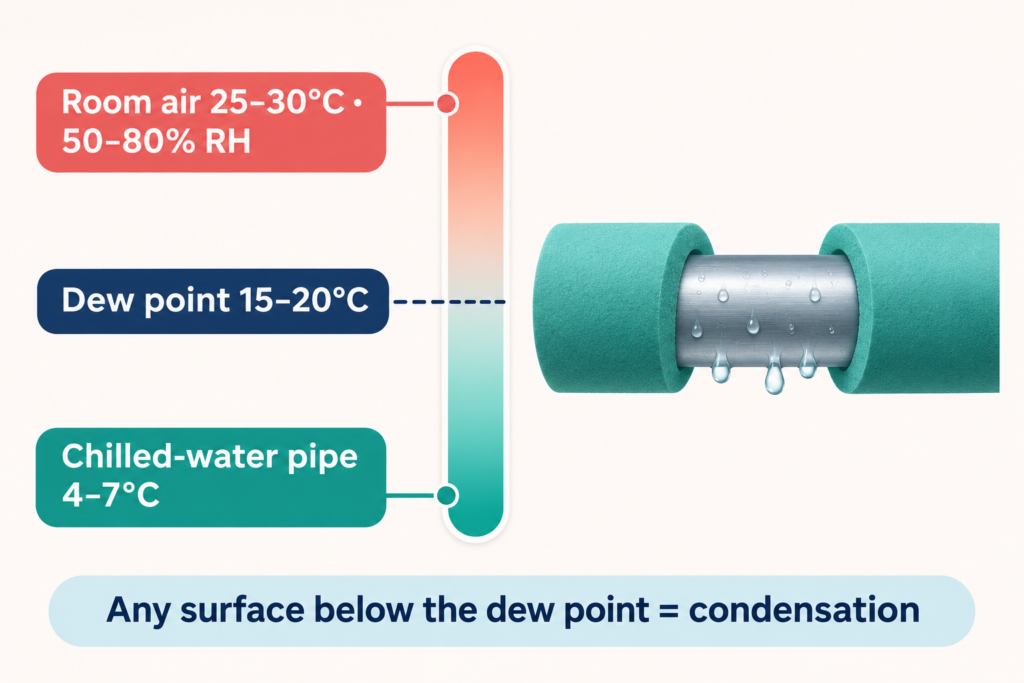
Chilled-water pipes typically operate at 4–7°C. The air around them is much warmer—often 25–30°C—with relative humidity (RH) of 50–80% or higher.
The dew point is the temperature at which that air becomes fully saturated and water vapour starts turning into liquid. In humid conditions, the dew point is often 15–20°C or higher—far above the pipe temperature.
| Air temperature | Relative humidity | Approx. dew point |
|---|---|---|
| 25°C | 50% | 14°C |
| 25°C | 70% | 19°C |
| 28°C | 60% | 19.5°C |
| 30°C | 70% | 24°C |
| 30°C | 80% | 26°C |
| 32°C | 75% | 27°C |
When any surface in the insulation system—the outer jacket, or a spot where the vapour barrier is broken—drops below the dew point, water vapour condenses on it. That water soaks into the insulation, drips from the pipe, or runs down to damage ceilings and equipment below.
This is not a leak from inside the pipe. It is moisture arriving from outside, driven by the temperature and humidity difference between the pipe and the surrounding air.
Why Does Chilled-Water Pipe Insulation Get Wet?
Moisture can enter a chilled-water insulation system through four main routes:
- Vapour pressure drive. Warm, humid air holds far more water vapour than the cold air at the pipe surface. This difference in vapour pressure pushes moisture inwards, towards the cold pipe, for as long as the system runs—even through materials with low permeance.
- Damaged or incomplete vapour barrier. If the outer facing is torn, poorly overlapped or sealed with low-quality tape, humid air reaches the insulation directly.
- Open seams and joints. Where insulation sections meet, or where the jacket is not sealed, humid air flows straight through to the pipe.
- Wet insulation reused during repair. If wet insulation is reinstalled—or new insulation is wrapped over wet material—the moisture stays trapped and keeps causing problems.
7 Common Causes of Chilled-Water Pipe Condensation
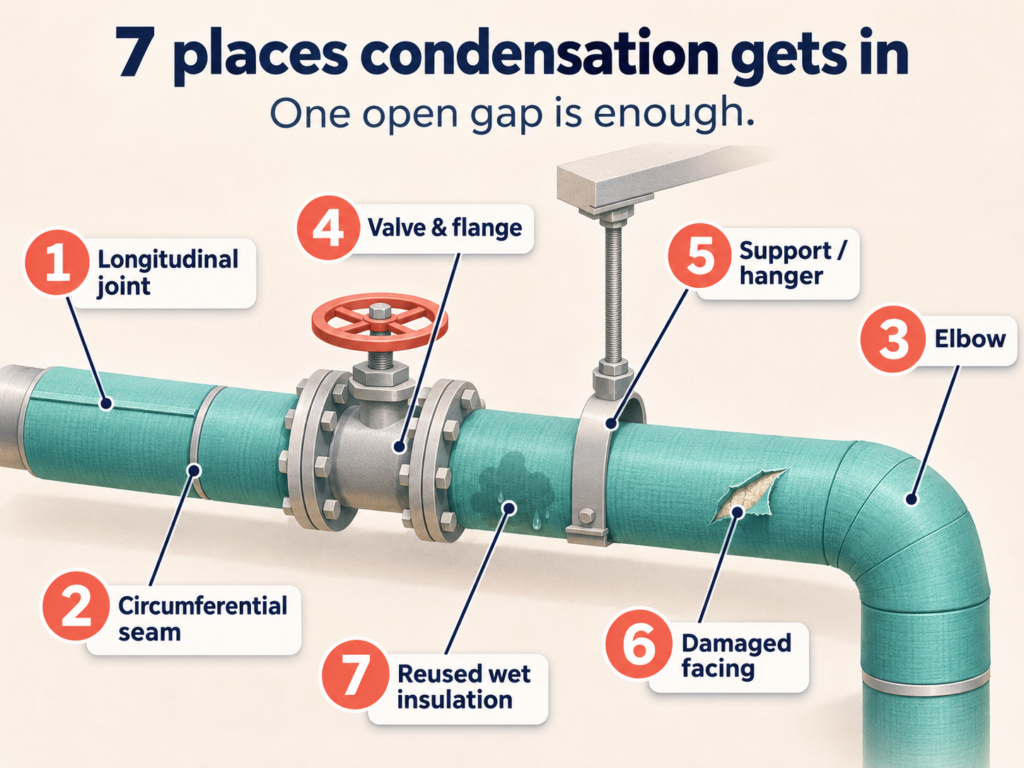
Most chilled-water pipe condensation starts at one of these seven spots. One unsealed gap is enough to let moisture into an otherwise sound system.
1. Open Longitudinal Joints
Where the two halves of split-pipe insulation meet along the pipe, the facing must overlap and be sealed with mastic and tape. However, if this joint is unsealed or the overlap is too small, humid air can enter along the entire length of the pipe.
2. Unsealed Circumferential (Butt) Joints
You also need to seal the joints where one insulation section meets the next. A gap of just 1–2 mm lets moisture in, and it can then travel along the inside of the insulation.
3. Elbows and Bends
Factory-made or field-fabricated insulation at elbows is critical. If the covering is incomplete, damaged or not sealed to the adjoining straight-pipe insulation, condensation will collect at the bend.
4. Valves, Flanges and Strainers
Installers often leave valves, flanges, strainers and union connections bare or loosely wrapped because they need access for maintenance. They become cold spots where condensation forms and drips onto equipment, piping or ceilings below.
5. Pipe Supports and Hangers
Where a metal clamp or bracket touches the pipe directly, it conducts cold outwards and interrupts the insulation. This creates a local cold zone where condensation forms and drips. On chilled-water lines, supports should sit on load-bearing insulated inserts so the insulation and vapour barrier stay continuous.
6. Damaged Outer Facing or Jacket
Foil-scrim-kraft (FSK) facing, aluminium cladding or plastic jacketing can be punctured, torn or corroded. Once that happens, humid air gets past the vapour barrier and reaches the insulation.
7. Wet Insulation Reused During Repair
Sometimes technicians remove and refit wet or partly dried insulation instead of replacing it. When that happens, the moisture stays trapped inside the system. Condensation and pipe corrosion will continue.
Why Does Patching Only the Dripping Area Fail?
When maintenance teams see chilled-water pipe condensation dripping from one spot, the instinct is to patch that spot—re-wrapping the insulation, re-sealing the joint or adding a valve cover.
This repair often fails because:
- The visible drip is downstream of the real entry point. Water has travelled along the inside of the insulation and collected at the lowest point.
- Moisture may already be trapped inside the existing insulation. A surface patch does not dry it out.
- If the space stays humid and the vapour barrier is not intact along the whole pipe run, moisture simply finds another way in.
A lasting fix means inspecting the full length of the pipe, finding every weak point and dealing with them together.
Chilled-Water Pipe Insulation Inspection Checklist
Use this table to check the full pipe run for the causes of chilled-water pipe condensation before deciding on repairs:
| Area to inspect | Warning sign | Why it matters | Recommended next action |
|---|---|---|---|
| Longitudinal seams | Unsealed or misaligned overlap, visible gaps | Moisture can enter along the entire pipe length | Reseal with mastic and foil tape; consider a full rewrap if the insulation is old |
| Circumferential joints | Gaps between sections, no tape visible | Direct path into the insulation core | Seal with mastic and suitable joint tape |
| Elbows and bends | Incomplete covering, separated jacket, loose edges | Condensation collects at bends and drips | Replace with a pre-formed elbow or a full field wrap with sealed overlaps |
| Valves and flanges | Bare metal, thin wrapping, no dedicated cover | Cold spots where condensation is almost certain | Fit an insulated jacket or pre-formed cover; seal all edges |
| Supports and brackets | Bare metal in contact with the pipe | Thermal bridge that creates a cold zone | Use insulated pipe supports; seal to the adjoining insulation |
| Outer facing | Tears, punctures, corrosion, damp patches | Vapour barrier is compromised | Tape small tears; replace the facing if damage is extensive |
| Insulation fit | Gaps, loose wrapping, crushed areas | Insulation no longer performs as designed | Refit snugly without over-compressing, as per the manufacturer’s instructions |
| Signs of moisture | Dark patches, water stains, mould, odour | Active condensation or water entry | Cut a sample to see how far moisture has spread; replace if wet throughout |
What Does a Condensation-Control Insulation System Need?
A chilled-water insulation system needs four things to resist condensation over the long term:
1. Suitable Closed-Cell Material
Closed-cell insulation—such as nitrile rubber (elastomeric) foam, XLPE foam, polyurethane (PUF) or phenolic foam—is preferred over open-cell fibrous materials for chilled-water lines. Closed-cell materials absorb very little water and resist vapour movement, so they hold their thermal performance far better if a small amount of moisture gets in.
2. Correct Thickness
The insulation must be thick enough to keep its outer surface above the dew point of the surrounding air. The right thickness depends on pipe size, chilled-water temperature, ambient temperature, humidity and the insulation’s thermal conductivity.
A good vapour barrier cannot make up for insulation that is too thin—and extra thickness cannot make up for a broken vapour barrier. You need both. Contact MaruCool for thickness guidance based on your pipe sizes, location and operating conditions.
3. Continuous Vapour Barrier
Specifications for below-ambient piping commonly call for a vapour retarder with a permeance of 0.02 perm or lower. It must cover the whole system—pipe, elbows, valves, supports and every joint—with no gaps.
4. Sealed Joints and Details
Seal every longitudinal seam, circumferential joint, elbow, valve cover and transition with mastic and tape rated for the application. Low-quality sealing materials or incomplete overlaps will eventually fail.
On top of these four, you need careful workmanship during installation, a final inspection before commissioning, and periodic checks during humid months—especially the monsoon.
Should You Repair or Replace Pipe Insulation?
The decision depends on four factors:
- Extent of damage. If only one or two small areas are wet or damaged, targeted repair may be enough. If moisture has spread across a long section, replacement is more cost-effective and durable.
- Age of the system. Older insulation, especially fibrous types, may have degraded vapour barriers or crushed areas that make full replacement the safer choice.
- Accessibility. If the pipe is in a tight or concealed space, the cost of a partial repair may come close to that of a full rewrap.
- Repair history. If condensation has come back after earlier repairs, the system is not controlling condensation and should be redesigned and replaced.
A qualified MEP consultant or insulation specialist can advise on the cost–benefit trade-off. For the same problem on air ducts, read why AC ducts sweat and how to fix it. To see where else insulation matters, read our practical guide to insulation in HVAC systems, or explore HVAC pipe insulation options.
Final Takeaway
Chilled-water pipe condensation is a system failure, not just a local wet patch. A lasting solution means finding every weak point in the insulation and vapour barrier, sealing it continuously, and using materials matched to the operating conditions.
The drip is the symptom. The root cause—unsealed joints, a damaged vapour barrier or poor system design—must be found and corrected for the repair to last.
Need Help With Chilled-Water Pipe Insulation?
Planning a new chilled-water installation, or dealing with condensation that keeps coming back? Share these details with MaruCool for a suitable insulation recommendation:
- Pipe sizes and approximate lengths
- Chilled-water supply temperature
- Ambient temperature and humidity where the pipes run
- Installation location (plant room, ceiling void, shaft or outdoors)
- Photos of the problem area, if it is an existing system
Think Insulation, Think MaruCool.
Frequently Asked Questions
Why does chilled-water pipe insulation still sweat after installation?
Usually because humid air is getting past the vapour barrier—through unsealed seams or bare valves, supports and elbows. Less often, the insulation is too thin for the local humidity, so its outer surface drops below the dew point. Inspect the full pipe run and check the seal integrity of the vapour barrier before repairing.
Can wet pipe insulation be dried and reused?
No. Wet insulation is very hard to dry fully in place, and trapped moisture keeps moving through it during operation, reducing thermal performance and raising the risk of corrosion on the pipe. Fibrous insulation is especially affected. Remove the wet sections, let the pipe surface dry, and fit new insulation with a sealed vapour barrier.
Is a vapour barrier necessary for chilled-water pipes?
Yes. Because the pipe is colder than the surrounding air, there is a constant vapour pressure drive towards it. Without a continuous, low-permeance vapour barrier, moisture will eventually reach the cold surface and condense. Some closed-cell materials have low permeance on their own, but every joint and seam still needs to be sealed.
Why does condensation appear near pipe supports and valves?
Uninsulated or poorly insulated supports and valves are thermal bridges—they conduct cold from the pipe and become local cold spots. The dew point is reached at these points first, so condensation collects there. Use insulated pipe supports and fit insulated valve covers that are sealed to the adjoining pipe insulation.
What is the best insulation for chilled-water pipes?
Closed-cell foam insulation, such as nitrile rubber (elastomeric) foam or XLPE foam, is widely used on chilled-water lines because it absorbs very little water and resists vapour movement. The right choice also depends on operating temperature, pipe size, fire-safety requirements and where the pipe runs.
How thick should chilled-water pipe insulation be?
It depends on pipe size, chilled-water temperature, ambient temperature and humidity, and the insulation’s thermal conductivity. The goal is to keep the outer surface above the dew point with a safety margin, so more humid locations need more thickness. Get a calculation for your site conditions instead of using one standard size everywhere.
References
- ASHRAE Handbook—Fundamentals, Chapter 1: Psychrometrics (dew point and moist-air properties).
- ASHRAE Handbook—Fundamentals, Chapter 23: Insulation for Mechanical Systems (below-ambient piping, vapour retarders).
- National Institute of Building Sciences, Mechanical Insulation Design Guide: Materials and Systems (WBDG).
- WBDG, An Introduction to Mechanical Insulation.